Tailscale but self-hosted
Tailscale is a modern VPN built on top of WireGuard protocol. Tailscale aims to provide a seamless and secure way for devices to communicate with each other over the internet, as if they were on the same local network. It works like an overlay network (layered on top of another network) between the computers of your networks - using NAT traversal. You can read about how all this works in depth from the article - How Tailscale works.
So, Tailscale is a secure mesh vpn network. This means that devices connected to Tailscale can communicate directly with each other whenever possible, without necessarily going through a central server. It even works with firewall on by using a technique called network hole punching. According to Wikipedia,
Hole punching (or sometimes punch-through) is a technique in computer networking for establishing a direct connection between two parties in which one or both are behind firewalls or behind routers that use network address translation (NAT). To punch a hole, each client connects to an unrestricted third-party server that temporarily stores external and internal address and port information for each client. The server then relays each client's information to the other, and using that information each client tries to establish direct connection; as a result of the connections using valid port numbers, restrictive firewalls or routers accept and forward the incoming packets on each side.
This direct communication can lead to faster speeds because the data doesn't have to travel through additional hops, which can introduce latency and slow down the connection. In contrast, traditional VPNs might route all traffic through a central server, which could introduce some delay.
By default it uses split DNS.
split-horizon DNS (also known as split-view DNS, split-brain DNS, or split DNS) is the facility of a Domain Name System (DNS) implementation to provide different sets of DNS information, usually selected by the source address of the DNS request.
When Tailscale is set up, it creates a virtual network that can connect devices across different physical locations. Split DNS ensures that when a device wants to access resources on its local network (resources within the Tailscale-defined network), the DNS resolution for those resources happens locally rather than being sent over the internet to external DNS servers.
Everything in Tailscale is Open Source, except the GUI clients for proprietary OS (Windows and macOS/iOS), and the control server. Tailscale also provides a free tier & it is very generous.
So, Tailscale client is open source but co-ordinaiton/control server is not. This server is responsible for device to join your network.
This is where headscale comes into the play. Headscale is
An open source, self-hosted implementation of the Tailscale control server.
According to headscale, their design goal is
Headscale aims to implement a self-hosted, open source alternative to the Tailscale control server. Headscale's goal is to provide self-hosters and hobbyists with an open-source server they can use for their projects and labs. It implements a narrow scope, a single Tailnet, suitable for a personal use, or a small open-source organisation.
So, as now the introduction is clear. Let's jump into setting up headscale. I'll be setting up headscale in a VPS that already has a Public IP. If you don't happen to have any, fear not! You can use Fly.io to get a domain for free. Heres an excellent youtube video that shows up the whole process with Fly.
I'll be using Nginx as reverse proxy and Let's Encrypt to get free certificate. All of this will be set up with docker compose
Pre-requisites
Domain name
I'll assume you have your own domain name setup that points to your machine's IP. We'll be setting up headscale on a subdoman. Create an A record in your DNS manager with headscale.yourdomain.com that points to your machine's IP address.
If you are using Cloudflare to manage DNS settings, turn of Proxy status for
now. Otherwise, it'll interfere with certificate request.
Open ports
- You need total three ports open. Port 80 & 443 on TCP & 3478 on UDP (needed for headscale websocket connection) from both your network (typically known as security list or group / ingress rule).
- Allow traffic on these port from the machine itself. Typically your machine will have either ufw or Firewalld acting as the firewall. I'm giving the commands of ufw, please search for your specific firewalls commands
sudo ufw status # check if ufw is enable or not
sudo ufw enable # enable ufw
sudo ufw status numbered   # check which ports are open
sudo ufw allow 80
sudo ufw allow 443
sudo ufw allow 3478/udp
Install Docker
There are plenty resources on Docker. Please follow one that's appropriate for your OS. Here's a link to install Docker on Ubuntu 20.04
Create a directory where we'll be doing all setup.
Name anything you like. In rest of the article, I'll assume you're in that directory.
Setup
Getting a subdomain
- Create a directory named
certbotand two directory inside thatconf&www - Create a directory named
nginx. Create sub directoryconfthen create a file namednginx.conf. Also create aDockerfilein the rootnginxdirectory
FROM nginx:latest- Create a
docker-compose.ymlin your root directory.
So after all these you'll have file structure like below,
.
├── certbot
│   ├── conf
│   └── www
├── nginx
│   ├──conf
│   │  └── nginx.conf
│   ├── Dockerfile
├── docker-compose.ymlversion: "3"
services:
nginx:
build:
context: ./nginx/
ports:
- 80:80
- 443:443
volumes:
- ./nginx/conf/:/etc/nginx/conf.d/:ro
- ./certbot/www:/var/www/certbot/:ro
- ./certbot/conf/:/etc/nginx/ssl/:ro
certbot:
image: certbot/certbot:arm64v8-latest
volumes:
- ./certbot/www/:/var/www/certbot/:rw
- ./certbot/conf/:/etc/letsencrypt/:rwserver {
listen 80;
listen [::]:80;
server_name headscale.yourdomain.com www.headscale.yourdomain.com;
server_tokens off;
location /.well-known/acme-challenge/ {
root /var/www/certbot;
}
}
Now, run the docker compose file
docker compose up -dAfter all services spins successfully, we then request for the certificate
docker compose run --rm certbot certonly --webroot -w /var/www/certbot --force-renewal --email [email protected] -d headscale.yourdomain.com --agree-tosCertbot will request for a certificate and if it succeeds, we are done with this step.
Headscale
- Create a folder named
headscale. Create two sub-direcotoryconfig,keys. Create aconfig.yaml&db.sqlitefile insideconfig
.
├── certbot
│ ├── conf
│ └── www
├── nginx
│ ├──conf
│ │ └── nginx.conf
│ ├── Dockerfile
├── headscale
│ ├──config
│ │ └── config.yaml
│ │ └── db.sqlite
│ ├── keys
├── docker-compose.ymlCopy the content of this file & paste in the config.yaml,
server_url: https://headscale.yourdomain.com
listen_addr: 0.0.0.0:8080Make sure to change these lines in the config.yaml to accept request from all ips.
Update your docker-compose.yaml
version: "3"

services:
  nginx:
    build:
      context: ./nginx/
    ports:
      - 80:80
      - 443:443
    volumes:
      - ./nginx/conf/:/etc/nginx/conf.d/:ro
      - ./certbot/www:/var/www/certbot/:ro
      - ./certbot/conf/:/etc/nginx/ssl/:ro

  certbot:
    image: certbot/certbot:arm64v8-latest
    volumes:
      - ./certbot/www/:/var/www/certbot/:rw
      - ./certbot/conf/:/etc/letsencrypt/:rw
headscale:
container_name: headscale
volumes:
- ./headscale/config:/etc/headscale/
- ./headscale/keys:/var/lib/headscale/
ports:
- 8081:8080
- 9090:9090
image: headscale/headscale:latest
command: headscale serve
restart: unless-stoppedmap $http_upgrade $connection_upgrade {
default keep-alive;
'websocket' upgrade;
'' close;
}
server {
	listen 80;
	listen [::]:80;

	server_name headscale.yourdomain.com www.headscale.yourdomain.com;
	server_tokens off;

	location /.well-known/acme-challenge/ {
		root /var/www/certbot;
	}
}
server {
listen 443 ssl http2;
listen [::]:443 ssl http2;
server_name headscale.nafiasib.com;
ssl_certificate /etc/nginx/ssl/live/headscale.nafiasib.com/fullchain.pem;
ssl_certificate_key /etc/nginx/ssl/live/headscale.nafiasib.com/privkey.pem;
location / {
proxy_pass http://headscale:8081;
proxy_http_version 1.1;
proxy_set_header Upgrade $http_upgrade;
proxy_set_header Connection $connection_upgrade;
proxy_set_header Host $server_name;
# proxy_redirect http:// https://;
proxy_buffering off;
proxy_set_header X-Real-IP $remote_addr;
proxy_set_header X-Forwarded-For $proxy_add_x_forwarded_for;
proxy_set_header X-Forwarded-Proto $http_x_forwarded_proto;
add_header Strict-Transport-Security "max-age=15552000; includeSubDomains" always;
}
}Now stop and run docker compose again.
docker compose down
docker compose up -d
Now we'll need to create accounts to add devices on the network. Let's add a mobile device first.
Download Tailscale from Google Play Store. Opening the app, you'll get the following screen
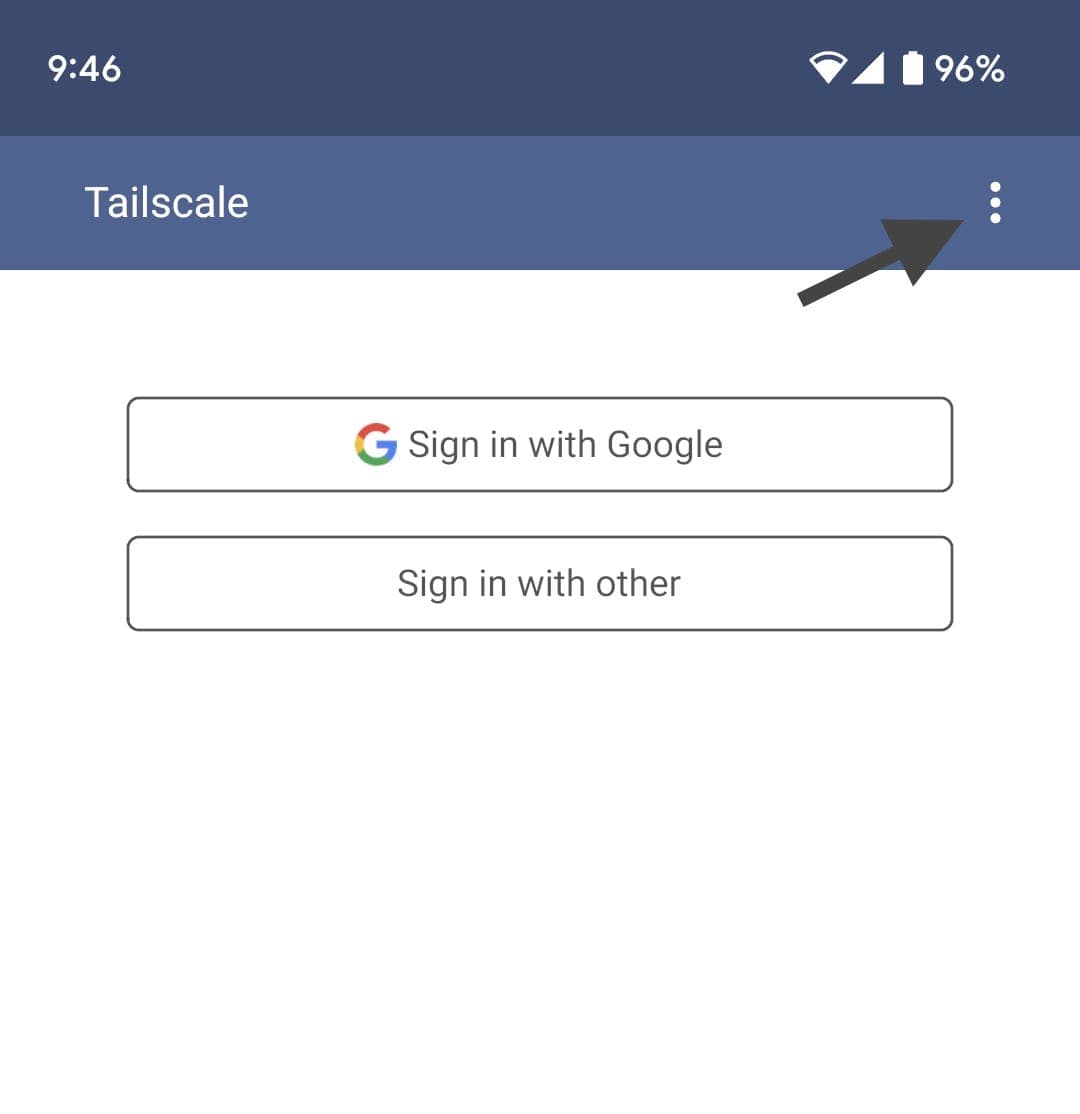
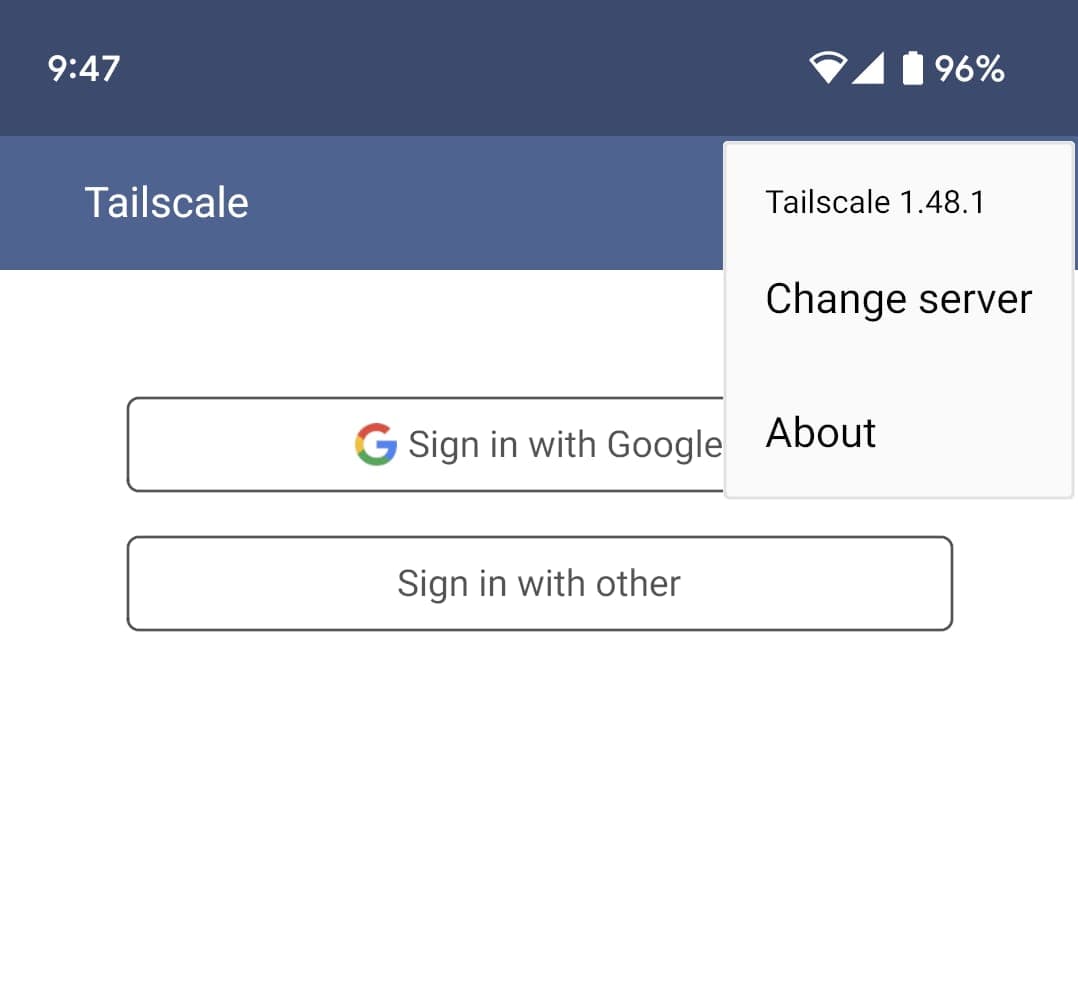
Tap the three-dots for a few time & Change Server option will appear.
Put your domain in the text box.
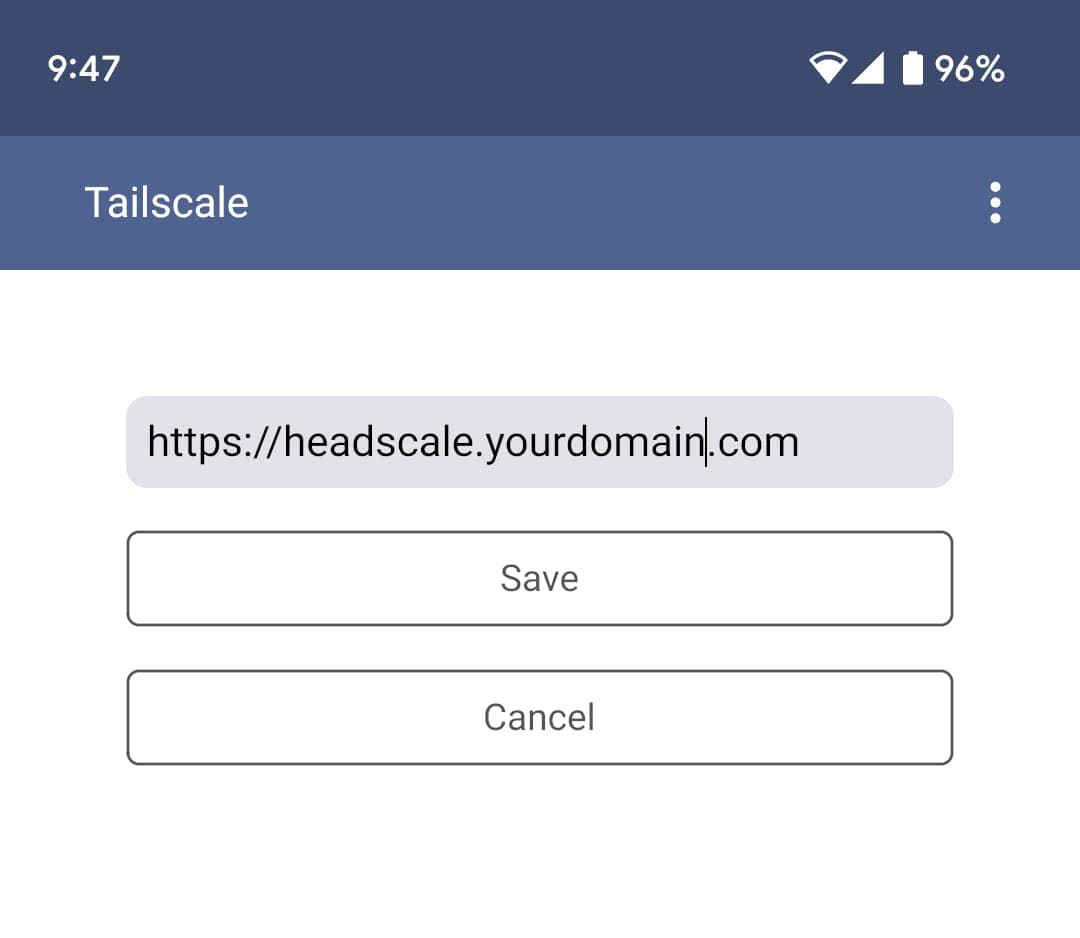
Now go back to inital screen and press Sign in with other button.
You'll be presented with a Machine registration page. Copy the key from the text.
Now back to your terminal. First, open bash in headscale container. Then add a user with the given key.
The instructions are given below. We're adding an user named android.
docker compose exec -it headscale bash
headscale user create android
headscale nodes register --user android --key nodekey:<key>
headscale user create tailscale
headscale --user tailscale preauthkeys create --expiration 1hversion: "3"
services:
nginx:
build:
context: ./nginx/
ports:
- 80:80
- 443:443
volumes:
- ./nginx/conf/:/etc/nginx/conf.d/:ro
- ./certbot/www:/var/www/certbot/:ro
- ./certbot/conf/:/etc/nginx/ssl/:ro
certbot:
image: certbot/certbot:arm64v8-latest
volumes:
- ./certbot/www/:/var/www/certbot/:rw
- ./certbot/conf/:/etc/letsencrypt/:rw
headscale:
container_name: headscale
volumes:
- ./headscale/config:/etc/headscale/
- ./headscale/keys:/var/lib/headscale/
ports:
- 8081:8080
- 9090:9090
image: headscale/headscale:latest
command: headscale serve
restart: unless-stopped
tailscale:
container_name: tailscale
image: tailscale/tailscale:stable
hostname: headtailscale
volumes:
- ./tailscale/data:/var/lib/tailscale
- /dev/net/tun:/dev/net/tun
network_mode: "host"
cap_add:
- NET_ADMIN
- NET_RAW
environment:
- TS_STATE_DIR=/var/lib/tailscale
- TS_EXTRA_ARGS=--login-server=https://headscale.nafiasib.com --advertise-exit-node --advertise-routes=192.168.0.0/16 --accept-dns=true
- TS_NO_LOGS_NO_SUPPORT=true
- TS_AUTHKEY=<your-key>
restart: unless-stoppedheadscale nodes list
headscale routes list
headscale routes enable -r <number>